Module philosophy
Before we look at what syntax is available inside modules, let's first talk at a high level about what modules are, how they differ from traditional scripts, and why you might need them.
A background on modules
JavaScript programs started off pretty small — most of its usage in the early days was to do isolated scripting tasks, providing a bit of interactivity to your web pages where needed, so large scripts were generally not needed. Fast forward a few years and we now have complete applications being run in browsers with a lot of JavaScript, as well as JavaScript being used in other contexts (Node.js, for example).
Complex projects necessitate a mechanism for splitting JavaScript programs into separate modules: units of code that can be imported when needed. Node.js has had this ability for a long time, and there are a number of JavaScript libraries and tools that enable module usage (for example, AMD loaders like RequireJS, bundlers like Webpack, and compilers like Babel).
All modern browsers support module features natively without needing transpilation. It can only be a good thing — browsers can automatically handle the module loading process, without requiring a library. It does not obsolete bundlers like Webpack, though — bundlers still do a good job at partitioning code into reasonably sized chunks, and are able to do other optimizations like minification, dead code elimination, and tree shaking.
What's a module?
JavaScript code can be evaluated in two ways: as a script (also called "classic script" or "traditional script") or as a module. There are two main differences:
- At parsing time, modules are parsed with a slightly different syntax. Namely, they are automatically in strict mode, and you can only use
importandexportstatements in modules. - At runtime, modules are executed in their own scope, not in the global scope. This means that variables, functions, classes, etc. declared in a module are not visible outside the module unless they are either explicitly exported (so they can be imported in other modules), or are made available globally by attaching them to the global object (e.g.,
windowin a browser). Uncaught errors from modules still show in the DevTools, but you won't be able to access module-scoped variables in the JavaScript console.
There are other differences, but they are specific to modules on the web. Find them in Using modules on the web.
Here is how scripts are traditionally attached to web pages:
<head>
  <script src="external-script.js"></script>
</head>
<body>
  <!-- page content -->
  <script src="external-script-2.js"></script>
  <script>
    // inline script
  </script>
</body>
// -- external-script.js --
function $() {
  // …
}
// …
// -- external-script-2.js --
$.ajax(/* … */);
// …
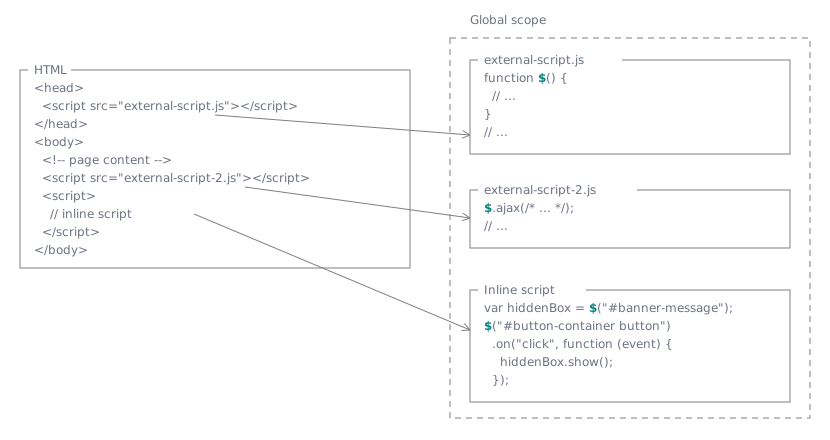
Most notably, all classic scripts attached to the webpage are executed under the same scope—the global scope. Any variables, unless they are contained within other functions or blocks, can be accessed from anywhere later in the page. This can be both convenient and dangerous. Shown in this figure is how the second and third scripts are able to access the $ variable declared in the first script, thanks to them all being in the global scope.
This pattern is very convenient, but it gets unwieldy at scale:
- Scope pollution and identifier conflicts become a big concern. Popular libraries like jQuery and Underscore put everything under special identifiers like
$and_to minimize the risk, but many third-party libraries compete for common names likemap,merge,debounce, etc. - All dependencies must be explicitly declared and managed by the author. If library A imports library B, then it's the application author's job to add a
<script>element that loads library B and ensure that it happens before A. - It's hard to load libraries on demand: everything is loaded and initialized as soon as the page loads.
Now, let us consider how this same code may look with modules. The first script, external-script.js, wants to share the variable $ with the rest of the scripts. It is done above by putting the variable in the global scope. In the module version, we can export the variable and import it in the other scripts.
<head>
  <script type="module" src="external-script-2.js"></script>
  <script type="module">
    import { $ } from "./external-script.js";
    // inline script
  </script>
</head>
<body>
  <!-- page content -->
</body>
// -- external-script.js --
function $() {
  // …
}
// …
export { $ };
// -- external-script-2.js --
import { $ } from "./external-script.js";

$.ajax(/* … */);
// …
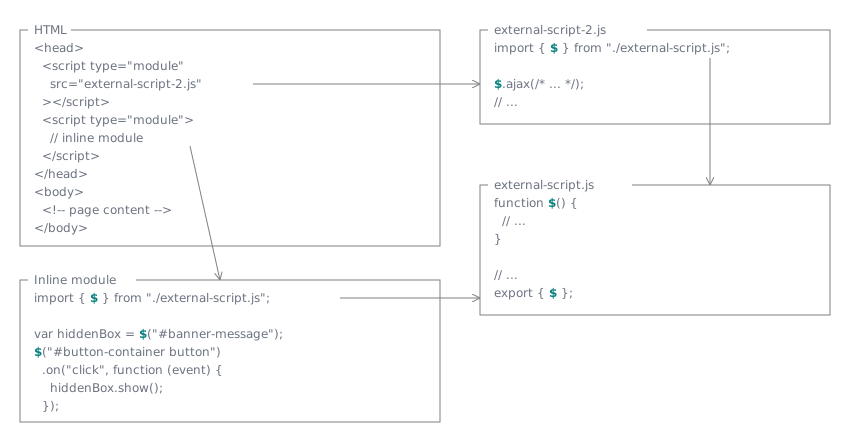
Whereas the script version formed a linear order of dependencies where each piece of code has access to all of the code coming earlier, the module version forms a dependency graph where each module explicitly declares the modules it relies on, and what variables it needs from those dependencies.
As we said, modules are parsed differently from scripts—this means that the JavaScript engine needs to know whether to apply the module or script parsing rules. Hosts commonly specify this using an out-of-band signaling mechanism, where the behavior of the code is configured by information outside of the code itself. (This is different from strict mode, where the interpretation mode is declared inside the script with "use strict".) There are many ways to give such information:
- If this module is referenced from a
<script>tag, you can use thetype="module"attribute. Also see Using modules on the web. - If you are using Node.js, you can use the
.mjsfile extension, or add"type": "module"to the closestpackage.jsonfile. Also see Modules across platforms. - If this module is to be used as a worker, you can pass
type: "module"when calling theWorker()constructor.
Note:
Certain runtimes, like Node.js, also have implicit module type detection if there's no explicit indication, based on whether the code uses syntax like import/export that's unavailable in non-modules. Browsers don't offer this.
Modules still have access to global variables. For example, a module can use a variable declared by a classic script:
<script>
  var text = "Hello";
</script>
<script type="module" src="render.js"></script>
// -- render.js --
document.body.textContent = text;
Aside — .mjs versus .js
Throughout this article, we've used .js extensions for our module files, but in other resources you may see the .mjs extension used instead. V8's documentation recommends this, for example. The reasons given are:
- You can tell if a file is a module or a script directly from the file, without looking at contextual clues like the HTML tag or the package.json.
- Outside of browsers, it's almost universally accepted as directly entering module mode, including by runtimes such as Node.js and build tools such as Babel.
For browsers, the difference is purely cosmetic. The file extension doesn't matter on the web—JavaScript is identified by the Content-Type header, and modules are identified by the type="module" attribute in the <script> tag. To get modules to work correctly in a browser, you need to make sure that your server is serving them with a Content-Type header that contains a JavaScript MIME type such as text/javascript. If you don't, you'll get a strict MIME type checking error along the lines of "The server responded with a non-JavaScript MIME type" and the browser won't run your JavaScript.
We decided to keep to .js. The main benefit is that the .js extension is much more widely understood than .mjs, and although the latter is catching up, you might always run into certain software that doesn't understand .mjs.
- Most servers automatically set the correct type for
.jsfiles, but some don't for.mjsfiles. Servers that already serve.mjsfiles correctly include GitHub Pages andhttp-serverfor Node.js. This is OK if you are using such an environment already, or if you aren't but you have access to configure your server to set the correctContent-Typefor.mjsfiles. It could however cause confusion if you don't control the server you are serving files from, or are publishing files for public use, as we are here. - The file extension is used by many tools other than the HTTP server. It may be used by your editor, the operating system, static analysis tools, formatters, and more.
.mjsmay be less well-supported by tooling at large. For example, some operating systems might not recognize it, or try to replace it with something else, such as implicitly appending a.jsextension when you try to open it.
If you really value the clarity of using .mjs for modules versus using .js for "normal" JavaScript files, but don't want to run into the problem described above, you could always use .mjs during development and convert them to .js during your build step.
Working with examples
To demonstrate usage of modules, we've created a simple set of examples that you can find on GitHub. These examples demonstrate a simple set of modules that create a <canvas> element on a webpage, and then draw (and report information about) different shapes on the canvas.
These are fairly trivial, but have been kept deliberately simple to demonstrate modules clearly.
In our first example (see basic-modules) we have a file structure as follows:
index.html
main.js
modules/
    canvas.js
    square.js
Note: All of the examples in this guide have essentially this same structure.
The index.html file only declares the DOM and applies the main.js module; all code we demonstrate subsequently concerns only the .js files.
The modules directory's two modules are described below:
canvas.js— contains functions related to setting up the canvas:create()— creates a canvas with a specifiedwidthandheightinside a wrapper<div>with a specified ID, which is itself appended inside a specified parent element. Returns an object containing the canvas's 2D context and the wrapper's ID.createReportList()— creates an unordered list appended inside a specified wrapper element, which can be used to output report data into. Returns the list's ID.
square.js— contains:name— a constant containing the string 'square'.draw()— draws a square on a specified canvas, with a specified size, position, and color. Returns an object containing the square's size, position, and color.reportArea()— writes a square's area to a specific report list, given its length.reportPerimeter()— writes a square's perimeter to a specific report list, given its length.
After you've downloaded these examples, start a local server and visit the index.html file.
Named exports
Unlike scripts, where all variables declared at the top level are implicitly accessible to subsequent scripts, you must explicitly export variables for them to be accessible in other modules. You can place this keyword in front of any declaration—including var, let, const, function, class, and more. They need to be top-level items: for example, you can't use export inside a function.
export const name = "square";

export function draw(ctx, length, x, y, color) {
  ctx.fillStyle = color;
  ctx.fillRect(x, y, length, length);

  return { length, x, y, color };
}
Equivalently, you can export things you already declared elsewhere inside this module by using export followed by a comma-separated list of variable names within curly braces:
export { name, draw, reportArea, reportPerimeter };
Named imports
Once you've exported some variables out of your module, you need to import them into another module to use them. You use the import statement, followed by a comma-separated list of the names you want to import wrapped in curly braces, followed by the keyword from, followed by the module specifier.
import { name, draw, reportArea, reportPerimeter } from "./modules/square.js";
You can see such lines in action in main.js.
Note:
The module specifier is a string that points to the module that exports these variables. In a browser, this is usually the URL relative to the URL of the current module, similar to the href attribute of <a> elements. For example, if our module above is served at https://example.com/basic-modules/main.js, and the square.js module is served at https://example.com/basic-modules/modules/square.js, then all of the following are equivalent:
"https://example.com/basic-modules/modules/square.js"
"/basic-modules/modules/square.js"
"./modules/square.js"
Different runtimes (browsers, Node, bundler, etc.) have different rules for the specifier format. You can read more about these differences in Using modules on the web and Modules across platforms.
Once you've imported the features into your script, you can use them just like they were defined inside the same file. The following is found in main.js, below the import lines:
const myCanvas = create("myCanvas", document.body, 480, 320);
const reportList = createReportList(myCanvas.id);

const square = draw(myCanvas.ctx, 50, 50, 100, "blue");
reportArea(square.length, reportList);
reportPerimeter(square.length, reportList);
Note:
The imported values are read-only views of the features that were exported. Similar to const variables, you cannot re-assign the variable that was imported, but you can still modify properties of object values. The value can only be re-assigned by the module exporting it. See the import reference for an example.
Default exports and imports
The examples above export and import variables by name. The names for each variable have to match between the exporter and the importer. You can write functional module code using just named imports and exports. However, if you want to import from non-ESM modules (like CommonJS or non-JavaScript files), these systems do not use named exports. In these systems, each module corresponds to exactly one JavaScript value. To represent these types of modules, JavaScript provides a default export. This has other use cases, such as modules that are built around one main value—a single class or function—where the default export lets each importer pick its own local name without knowing what the exporting module calls it.
Unlike named exports, default exports have no names associated with them. Each module can have up to one default export. To create a default export, instead of exporting a declaration like const or function, you export an expression instead, by prepending export default to it. For example, all of the following would work:
// An object literal is an expression
export default {
  some: "object",
};

// An addition is an expression
export default 1 + 1;

// An identifier is also an expression
export default randomSquare;
You can see the last version in our basic-modules square.js, which exports a function called randomSquare() that creates a square with a random color, size, and position. Note the lack of curly braces.
As a special case, functions and classes are exported as declarations, not expressions, and these declarations can be anonymous. So you can also default-export a function directly when you declare it:
export default function randomSquare(ctx) {
  // …
}
// -- main.js --
import randomSquare from "./modules/square.js";
Again, note the lack of curly braces. This is because there is only one default export allowed per module, and we know that randomSquare is it. You can name this import however you want—it doesn't have to match the function name on the exporting side.
Named exports and default export can coexist in the same module.
Avoiding naming conflicts
So far, our canvas shape drawing modules seem to be working OK. But what happens if we try to add a module that deals with drawing another shape, like a circle or triangle? These shapes would probably have associated functions like draw(), reportArea(), etc. too; if we tried to import different functions of the same name into the same top-level module file, we'd end up with conflicts and errors.
Let's look at a real example. In our renaming directory you'll see the same module system as in the previous example, except that we've added circle.js and triangle.js modules to draw and report on circles and triangles.
Inside each of these modules, we've got features with the same names being exported, and therefore each has the same export statement at the bottom:
export { name, draw, reportArea, reportPerimeter };
When importing these into main.js, if we tried to use
import { name, draw, reportArea, reportPerimeter } from "./modules/square.js";
import { name, draw, reportArea, reportPerimeter } from "./modules/circle.js";
import { name, draw, reportArea, reportPerimeter } from "./modules/triangle.js";
The browser would throw an error such as "SyntaxError: redeclaration of import name" (Firefox).
Fortunately there are a number of ways to get around this. We'll look at these in the following sections.
Renaming imports and exports
Inside your import and export statement's curly braces, you can use the keyword as along with a new feature name, to change the identifying name you will use for a feature inside the top-level module.
So in our renaming example, we can rename the imports so that they are unique:
import {
  name as squareName,
  draw as drawSquare,
  reportArea as reportSquareArea,
  reportPerimeter as reportSquarePerimeter,
} from "./modules/square.js";

import {
  name as circleName,
  draw as drawCircle,
  reportArea as reportCircleArea,
  reportPerimeter as reportCirclePerimeter,
} from "./modules/circle.js";

import {
  name as triangleName,
  draw as drawTriangle,
  reportArea as reportTriangleArea,
  reportPerimeter as reportTrianglePerimeter,
} from "./modules/triangle.js";
Note that you could solve the problem in the module files instead, e.g.
// -- square.js --
export {
  name as squareName,
  draw as drawSquare,
  reportArea as reportSquareArea,
  reportPerimeter as reportSquarePerimeter,
};
// -- main.js --
import {
  squareName,
  drawSquare,
  reportSquareArea,
  reportSquarePerimeter,
} from "./modules/square.js";
And it would work just the same. What style you use is up to you, however it arguably makes more sense to leave your module code alone, and make the changes in the imports. This especially makes sense when you are importing from third party modules that you don't have any control over.
By the way, you can use the same syntax for default exports too, by referring to the export name default (this is a reserved word, not an actually valid identifier name). The difference with export default randomSquare; is that this exports the existing live binding, instead of capturing the value of the expression. If you re-assign randomSquare in the exporter, this form allows the importer to see the new value. Named default function and class declarations, such as export default function randomSquare() {}, also export live bindings.
import { default as randomSquare } from "./modules/square.js";

export { randomSquare as default };
Creating a module namespace object
The above method works OK, but it's a little messy and long-winded. An even better solution is to import each module's features inside a module namespace object. The following syntax form does that:
import * as Module from "./modules/module.js";
This grabs all the exports available inside module.js, and makes them available as members of an object Module, effectively giving it its own namespace. So for example:
Module.function1();
Module.function2();
Again, let's look at a real example. If you go to our module-objects directory, you'll see the same example again, but rewritten to take advantage of this new syntax. In the modules, the exports are all in the following simple form:
export { name, draw, reportArea, reportPerimeter };
The imports on the other hand look like this:
import * as Canvas from "./modules/canvas.js";

import * as Square from "./modules/square.js";
import * as Circle from "./modules/circle.js";
import * as Triangle from "./modules/triangle.js";
In each case, you can now access the module's imports underneath the specified object name, for example:
const square = Square.draw(myCanvas.ctx, 50, 50, 100, "blue");
Square.reportArea(square.length, reportList);
Square.reportPerimeter(square.length, reportList);
So you can now write the code just the same as before (as long as you include the object names where needed), and the imports are much neater.
Modules and classes
As we hinted at earlier, you can also export and import classes; this is another option for avoiding conflicts in your code, and is especially useful if you've already got your module code written in an object-oriented style.
You can see an example of our shape drawing module rewritten with ES classes in our classes directory. As an example, the square.js file now contains all its functionality in a single class:
class Square {
  constructor(ctx, listId, length, x, y, color) {
    // …
  }

  draw() {
    // …
  }

  // …
}
which we then export:
export { Square };
// -- main.js --
import { Square } from "./modules/square.js";
And then use the class to draw our square:
const square = new Square(myCanvas.ctx, myCanvas.listId, 50, 50, 100, "blue");
square.draw();
square.reportArea();
square.reportPerimeter();
Aggregating modules
We now have multiple modules, each doing a similar thing. If someone wants to use several of these, they have to write a separate import declaration for each:
import { Square } from "./modules/square.js";
import { Circle } from "./modules/circle.js";
import { Triangle } from "./modules/triangle.js";
But it would be better if we could put all these exports into the same module, so no matter how many of these exports users need, they can grab all of them with one import.
import { Square, Circle, Triangle } from "./modules/shapes.js";
In our module-aggregation example (based on our earlier classes example) we've got an extra module called shapes.js, which aggregates all the functionality from circle.js, square.js, and triangle.js together. This is called a "barrel module" because it doesn't do anything other than aggregating exports from all other modules. We've also moved our submodules inside a subdirectory inside the modules directory called shapes. So the module structure in this example is:
modules/
  canvas.js
  shapes.js
  shapes/
    circle.js
    square.js
    triangle.js
// -- shapes.js --
import { Circle } from "./shapes/circle.js";
import { Square } from "./shapes/square.js";
import { Triangle } from "./shapes/triangle.js";

export { Circle, Square, Triangle };
These grab the exports from the individual submodules and effectively make them available from the shapes.js module. But there's no need to import something just to export it. You can use the export ... from syntax to directly import and re-export in one line.
export { Square } from "./shapes/square.js";
export { Triangle } from "./shapes/triangle.js";
export { Circle } from "./shapes/circle.js";
Note:
The exports referenced in shapes.js basically get redirected through the file and don't really exist there, so you won't be able to write any useful related code inside the same file.
Alternatively, you can replace shapes.js with the special export * from syntax:
export * from "./shapes/square.js";
export * from "./shapes/triangle.js";
export * from "./shapes/circle.js";
This re-exports all exports (other than the default) from the target module as named exports of the current module, so if you export something else from square.js, you don't have to modify shapes.js as well. Only do this if you actually want shapes.js to re-export everything from square.js, or you may accidentally expose things.
Almost all import syntaxes we've introduced have export ... from equivalents. The only exception is the default import import x from "mod", for which export x from "mod" does not exist, and you must use the special export { default } from syntax.
export { x } from "mod";
export { x as v } from "mod";
export * as ns from "mod";
export { default } from "mod";
Importing a module for its side effects
Sometimes you want to run a module's initialization code without importing any of its exports, for example, to install a polyfill. Use an import with only a module specifier:
import "./modules/polyfills.js";
See the import reference for more information.
Import declarations are hoisted
Import declarations are hoisted. In this case, it means that the imported values are available in the module's code even before the place that declares them, and that the imported module's side effects are produced before the rest of the module's code starts running.
So for example, in main.js, importing Canvas in the middle of the code would still work:
// …
const myCanvas = new Canvas("myCanvas", document.body, 480, 320);
myCanvas.create();
import { Canvas } from "./modules/canvas.js";
myCanvas.createReportList();
// …
However, it is considered good practice to put all your imports at the top of the code, which makes it easier to analyze dependencies.
Importing JSON modules
We have seen how to import from JavaScript modules, where data is exported with export statements. You can also import values from modules written in other languages, as long as the runtime environment knows how to interpret them. The specification only defines two other resource types: JSON modules and text modules. Here, we look at JSON modules, which are more common.
A JSON module is basically a standalone JSON file. When imported, it provides a single default export containing the parsed JSON value. You import it like this:
import data from "./data.json" with { type: "json" };
Notice the extra with { type: "json" } at the end. This is an import attribute that tells the runtime environment to validate that the loaded file is indeed JSON. We will talk more about them in the Using modules on the web guide, because their semantics are not defined in the core language. You might be able to import JSON modules without with { type: "json" }. The only requirement is that if with { type: "json" } is specified, then the loaded module must be parsed as JSON. It is good practice to always declare the type of the module you are importing so it can work everywhere.
Text modules work similarly and result in strings.
import text from "./text.txt" with { type: "text" };
Dynamic module loading
You can also dynamically load modules only when they are needed, rather than having to load everything up front. This has some obvious performance advantages; let's read on and see how it works.
The import() operator can be called with the path to the module as a parameter. It returns a Promise, which fulfills with a module namespace object (see Creating a module namespace object) giving you access to that object's exports. For example:
import("./modules/myModule.js").then((module) => {
  // Do something with the module.
});
Note:
Dynamic import is permitted in the browser main thread, and in shared and dedicated workers.
However import() will reject if called in a service worker or worklet.
Let's look at an example. In the dynamic-module-imports directory we've got another example based on our classes example. This time however we are not drawing anything on the canvas when the example loads. Instead, we include three buttons — "Circle", "Square", and "Triangle" — that, when pressed, dynamically load the required module and then use it to draw the associated shape.
In this example we've only made changes to our index.html and main.js files — the module exports remain the same as before.
Over in main.js we've grabbed a reference to each button using a document.querySelector() call, for example:
const squareBtn = document.querySelector(".square");
We then attach an event listener to each button so that when pressed, the relevant module is dynamically loaded and used to draw the shape:
squareBtn.addEventListener("click", () => {
  import("./modules/square.js").then((Module) => {
    const square = new Module.Square(
      myCanvas.ctx,
      myCanvas.listId,
      50,
      50,
      100,
      "blue",
    );
    square.draw();
    square.reportArea();
    square.reportPerimeter();
  });
});
Note that, because the promise fulfillment returns a module namespace object, the class is then made a subfeature of the object, hence we now need to access the constructor with Module. prepended to it, e.g., Module.Square( /* … */ ).
Another advantage of dynamic imports is that they are always available, even in script environments. Therefore, if you have an existing <script> tag in your HTML that doesn't have type="module", you can still reuse code distributed as modules by dynamically importing it.
<script>
  import("./modules/square.js").then((module) => {
    // Do something with the module.
  });
  // Other code that operates on the global scope and is not
  // ready to be refactored into modules yet.
  var btn = document.querySelector(".square");
</script>
Top-level await
Top-level await is a feature available within modules: the await keyword can be used at the top level, outside any async function. It allows a module to act as a big asynchronous function, meaning it can finish asynchronous work before modules that depend on it execute, without blocking the evaluation of sibling modules that don't depend on it.
Let's take a look at an example. You can find all the files and code described in this section within the top-level-await directory, which extends from the previous examples.
Firstly we'll declare our color palette in a separate colors.json file:
{
  "yellow": "#F4D03F",
  "green": "#52BE80",
  "blue": "#5499C7",
  "red": "#CD6155",
  "orange": "#F39C12"
}
Then we'll create a module called getColors.js which uses a fetch request to load the colors.json file and return the data as an object.
// fetch request
const colors = fetch(
  "https://mdn.github.io/js-examples/module-examples/top-level-await/data/colors.json",
).then((response) => response.json());

export default await colors;
Notice the last export line here.
We're using the keyword await before specifying the constant colors to export. This means any other modules which include this one will wait until colors has been downloaded and parsed before using it.
// -- main.js --
import colors from "./modules/getColors.js";
import { Canvas } from "./modules/canvas.js";

const circleBtn = document.querySelector(".circle");

// …
We'll use colors instead of the previously used strings when calling our shape functions:
const square = new Module.Square(
  myCanvas.ctx,
  myCanvas.listId,
  50,
  50,
  100,
  colors.blue,
);

const circle = new Module.Circle(
  myCanvas.ctx,
  myCanvas.listId,
  75,
  200,
  100,
  colors.green,
);

const triangle = new Module.Triangle(
  myCanvas.ctx,
  myCanvas.listId,
  100,
  75,
  190,
  colors.yellow,
);
This is useful because the code within main.js won't execute until the code in getColors.js has run. However, it doesn't hold up the evaluation of independent modules: our canvas.js module still evaluates while colors is being fetched.
Top-level await is not free; it has deep implications because it means a part of the module graph can only be evaluated asynchronously. See the module graph guide for more information.
Module metadata
Scripts are executed in the global context, so they can get information about their environment with global variables, such as Window.document or Window.location. Each module also has its own execution context which is accessed via a module-specific import.meta object. The properties of this object are defined by the host environment; the core language spec does not define any properties. See Using modules on the web for information about browsers, and Modules across platforms for information about Node.js, bundlers, and more.
Just as an example, in most web-like environments (browsers, Node.js, bundlers, etc.), import.meta.url provides the module's URL, which you can use to locate a resource relative to the module:
// -- modules/getColors.js --
const colorsURL = new URL("../data/colors.json", import.meta.url);
This keeps the resource URL relative to getColors.js even when the module is imported from a page or module in another directory.
Language versus host responsibilities
This article introduces modules as they are defined in the ECMAScript spec. JavaScript modules are inherently tied to the host environment. They need to adapt to different I/O conditions, different architectures, and different engineering needs. As such, the core language only defines the following:
- The syntax for module features, such as
importandexportdeclarations,import.meta, and theimport()expression. - Module graph building, linking, and evaluation, including cycle detection.
- The module namespace object's shape.
The core language does not care about the following:
- The concept of "files". Although each module is conventionally a separate file, it could as well be an in-memory object, a dynamically fetched string, or anything that can be represented as a JavaScript value.
- The structure of the module specifier string. It could be a URL, a file path, or any other identifier the host recognizes.
- The properties of
import.meta. All properties, includingimport.meta.url, are host-defined. - The module loading process. The host environment is responsible for fetching modules, including applying any import attributes, subject to the language's requirements, such as those for JSON modules.
In reality, runtime environments like browsers, Node.js, and Deno often end up implementing the same set of features, so that code is more likely to work across platforms. This guide walks through an example that's run in the browser, but we focus on core concepts that are applicable to all environments. In the Using modules on the web guide, we'll cover the specifics of module loading in browsers, especially import specifiers. Then, in the Modules across platforms guide, we will go further and discuss how the module system is integrated with other environments.
See also
- Using modules on the web
- Understanding the module graph
- Modules across platforms
- JavaScript modules on v8.dev (2018)
- ES modules: A cartoon deep-dive on hacks.mozilla.org (2018)
- ES6 in Depth: Modules on hacks.mozilla.org (2015)
- Exploring JS, Ch.16: Modules by Dr. Axel Rauschmayer